Last Tuesday, I was standing in my kitchen at 6:45 PM, staring into the abyss of my refrigerator. The light flickered. There was a wilted bunch of spinach, three eggs, and—crucially—a head of broccoli that had been hiding in the crisper drawer for four days. My husband had just walked in from work, looking like he’d survived a marathon. My kids were already bickering over whose turn it was to put on their shoes. And I knew, with absolute certainty, that if I suggested a salad or a “light” stir-fry, I would be eating alone.
I needed a win. I needed something fast, something that wouldn’t require me to explain the nutritional benefits of cruciferous vegetables to two people who believe broccoli is a color, not a vegetable. I needed dinner to just work.
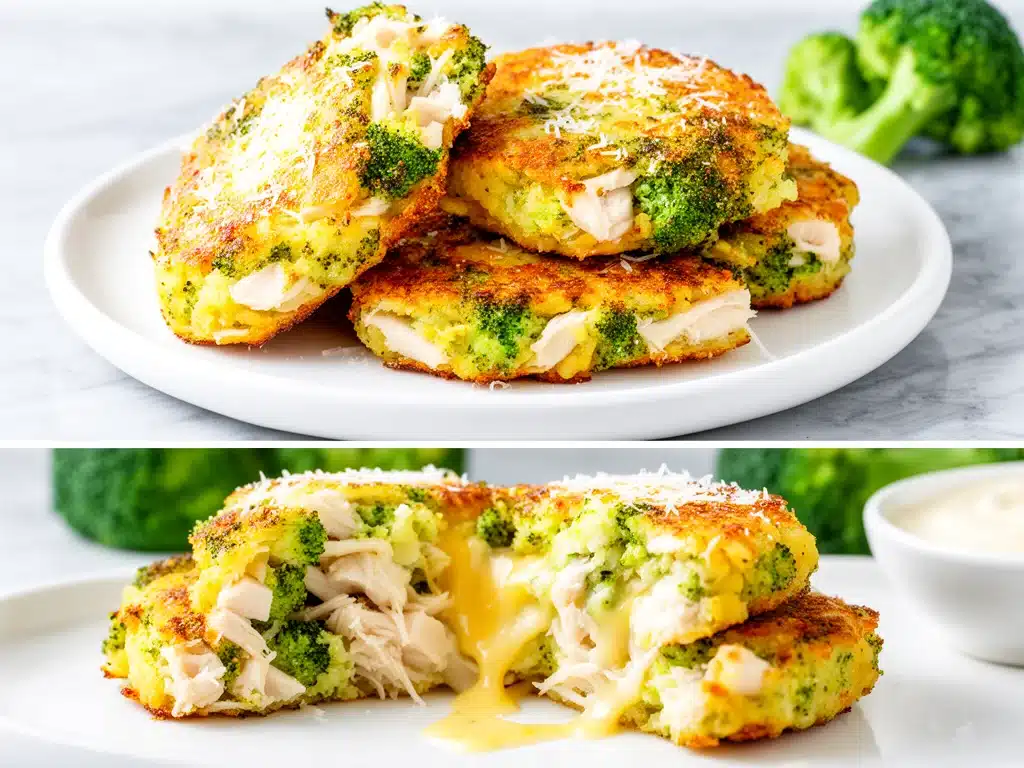
So I did what any desperate parent does: I improvised. I chopped that sad broccoli into tiny florets, mixed it with leftover rotisserie chicken, some shredded cheddar, and a handful of pantry staples. I threw the mixture into a skillet with a little olive oil, flattened it into patties, and waited. The smell that filled our house was incredible—savory, cheesy, and warm. It smelled like comfort.
Thirty minutes later, we were sitting at the table. And then, the miracle happened. My five-year-old picked up a cheesy broccoli and chicken fritter, took a bite, and said, “Can I have the crunchy ones again?”
I didn’t even blink. I just nodded and passed him the plate. That night, I discovered that sometimes the best recipes aren’t the ones you plan; they’re the ones you create when you’re running on fumes but refuse to serve takeout. Since then, I’ve made these back-to-school cheesy broccoli and chicken fritters at least ten times. They’ve become my secret weapon for busy evenings, my go-to lunchbox addition, and the only way I can get my kids to eat their greens without a single complaint. If you’re looking for a meal that’s crispy on the outside, tender on the inside, and ready in under 30 minutes, you’re going to fall in love with this one. Trust me. It’s a game-changer.
Why You’ll Love This Recipe
There are about a dozen reasons I keep making these fritters, but let’s be real—you’re here because you need dinner to happen, and you need it to be good. Here’s why this recipe has earned a permanent spot in my weekly rotation:
It’s a Vegetable Trojan Horse — Seriously. These cheesy broccoli and chicken fritters are the ultimate hack for picky eaters. The broccoli is finely chopped and mixed into the binding agents, so it’s practically invisible. My kids think they’re just eating crispy chicken nuggets with a cheesy crust. I feel like a genius. You can hide as much broccoli as you want (I usually use two cups), and nobody will know.
Stupid Simple Prep — I don’t have time for fancy techniques. This recipe requires zero special skills. If you can chop a vegetable and mix ingredients in a bowl, you can make this. I’ve walked my teenage daughter through it over FaceTime, and she nailed it on the first try. No whisking meringues, no kneading dough. Just mix, form, and fry.
Lightning Fast — From the moment I pull the chicken out of the fridge to the moment we sit down, it’s about 25 minutes. Ten minutes of chopping and mixing, and 15 minutes of cooking. This is perfect for those chaotic back-to-school nights when you have soccer practice, homework, and a meltdown brewing all at once. It’s fast enough for a Tuesday and reliable enough for a Friday.
Uses Up Leftovers — This is my favorite “clean out the fridge” recipe. Got half a rotisserie chicken sitting there? Perfect. Have a bag of frozen broccoli that’s been in there too long? Chop it up and toss it in. These fritters are incredibly forgiving. They turn whatever leftovers you have into a cohesive, delicious meal. I’ve made them with leftover turkey, leftover salmon, and even canned tuna (don’t judge me, it worked).
Makes Amazing Leftovers (and Lunches) — Here’s the best part: these fritters taste just as good cold or reheated as they do hot. I deliberately make extra for lunch the next day. My kids love them dipped in ketchup or ranch, straight out of the lunchbox. They hold their shape well and don’t get soggy. It’s like having homemade chicken nuggets that actually have veggies in them.
Budget-Smart — Chicken breasts can be pricey, but using a rotisserie chicken from the grocery store cuts the cost in half. Broccoli is cheap, especially if you buy it frozen. Cheese is an investment, but you only need a little bit to make these taste incredible. Feeds 4-6 people for under $15, depending on your local prices.
This is my go-to when I need dinner to just work. No complicated techniques, no weird ingredients, just reliable, delicious food that makes everyone happy. And honestly? It makes me feel like a good mom, even on the days I’m wearing sweatpants.
Ingredients You’ll Need
Here’s the best part: you probably have most of this already. The ingredient list is short, simple, and focused on flavor. I’m particular about a few things here, so pay close attention to the notes.
For the Fritter Base
Cooked Chicken (3 cups, shredded or diced / about 450g) — I use rotisserie chicken because it’s tender and flavorful. You can use grilled chicken breast, poached chicken, or even canned chicken (though the texture is different). Make sure it’s shredded into small, bite-sized pieces. Large chunks make the fritters fall apart.
Broccoli (2 cups, finely chopped / about 150g) — Fresh or frozen works. If using frozen, thaw it and squeeze out ALL the water. I know, it’s tedious, but excess moisture is the enemy of crispy fritters. I use a food processor to pulse the broccoli into tiny bits—it’s faster and ensures even distribution. If you’re chopping by hand, get it as fine as you can.
Eggs (2 large) — These are the binder. They hold everything together. Don’t skip them. Room temperature eggs mix better, but cold ones work fine too.
Shredded Cheddar Cheese (1 cup / 100g) — Sharp cheddar has the best flavor, but mild cheddar works if your kids are sensitive. Buy a block and shred it yourself. Pre-shredded cheese has anti-caking agents that prevent it from melting smoothly, which can make your fritters greasy or grainy.
All-Purpose Flour (½ cup / 60g) — This helps bind the mixture further and creates that crispy exterior. If you need gluten-free, use a 1:1 gluten-free flour blend. I’ve tested it, and it works great.
For the Flavor

Garlic (3 cloves, minced / about 1 tablespoon) — Fresh garlic is non-negotiable. It adds that savory depth that makes these fritters irresistible. If you’re in a rush, use jarred minced garlic, but fresh tastes so much better.
Onion (½ medium yellow onion, finely diced / about 75g) — I like to sauté the onion first for sweetness, but if you’re short on time, you can use raw finely diced onion. Just make sure it’s very small so it cooks through in the fritter.
Dried Parsley (1 teaspoon) — Adds a fresh, herbal note. If you have fresh parsley, use 1 tablespoon chopped. It’s optional but recommended.
Black Pepper (½ teaspoon) — Freshly cracked is best. It adds a little heat and complexity.
Salt (½ teaspoon, or to taste) — Taste your mixture before forming the fritters. Adjust salt if needed. Remember, the cheese is already salty, so be careful not to over-salt.
Optional Add-ins: I sometimes add a tablespoon of Dijon mustard for tang, or a pinch of garlic powder for extra punch. You can also add a handful of sliced green onions for a fresh bite.
Equipment Needed
You don’t need fancy equipment for this. Here’s what I actually use:
Large Skillet or Cast Iron Pan — I use a 12-inch cast iron skillet because it holds heat evenly and gives the best crust. A non-stick skillet works too, especially if you’re worried about sticking. Just don’t use a tiny pan; you need room to spread the fritters out so they cook properly.
Food Processor — Optional but highly recommended for chopping the broccoli. It saves time and ensures uniform pieces. If you don’t have one, a sharp knife and a cutting board work fine.
Mixing Bowls — One large bowl for mixing the fritter ingredients. I use a glass bowl because it’s easy to see what’s going on.
Spatula — A flexible silicone spatula is best for flipping the fritters without breaking them. I have a few; they’re cheap and worth it.
Paper Towels — For draining excess oil from the cooked fritters. I also use them to pat the chicken dry if I’m using leftover rotisserie chicken that’s a bit wet.
Measuring Cups and Spoons — Standard stuff. I keep a set in my drawer that’s seen better days, but they work perfectly.
Tongs — Helpful for flipping multiple fritters at once. If you’re flipping one at a time, a spatula is fine.
Optional but nice: A wire rack set over a baking sheet. I use this to keep the fritters warm in a low oven while I cook the rest. It’s better than leaving them on a plate, which can make the bottoms soggy.
How to Make It: Step-by-Step
Alright, let’s make this! I’m walking you through exactly how I do it, including the little tricks I’ve picked up over the years. It’s straightforward, but there are a few key steps that make the difference between good and great.
Step 1: Prep Your Broccoli (5 minutes)
If you’re using fresh broccoli, wash it and chop it into small florets. If you’re using frozen, thaw it completely. Here’s the critical part: squeeze the broccoli. I put it in a clean kitchen towel or several layers of paper towels and wring it out as hard as you can. You want to remove as much moisture as possible. Wet broccoli = soggy fritters. Dry broccoli = crispy perfection. It takes a minute, but it’s worth it.
If you have a food processor, pulse the broccoli until it’s finely chopped. It should look almost like rice. This ensures the broccoli is evenly distributed and cooks through quickly. If you’re chopping by hand, just get it as small as you can manage.
Step 2: Mix the Fritter Base (5 minutes)
In a large mixing bowl, combine the shredded chicken, chopped broccoli, shredded cheddar cheese, eggs, flour, minced garlic, diced onion, dried parsley, black pepper, and salt. Mix everything together with a spoon or your hands until well combined. The mixture should be moist but not runny. If it feels too dry, add another egg. If it feels too wet, add a little more flour.
At this stage, taste a small spoonful of the mixture (it’s safe because the eggs will cook in the pan). Adjust the seasoning if needed. Do you need more salt? More pepper? A pinch of garlic powder? Now is the time to fix it.
Step 3: Heat the Pan (3 minutes)
Place your large skillet over medium heat. Add 2 tablespoons of olive oil or avocado oil. Let it heat up for about 2-3 minutes. You’ll know it’s ready when the oil shimmers and a tiny drop of water sizzles when you flick it into the pan. Don’t let the oil get too hot, or the outside will burn before the inside cooks.
Step 4: Form and Cook the Fritters (10-12 minutes)
Using your hands or a scoop, form the mixture into patties. I like to make them about 3 inches wide and ½ inch thick. They don’t need to be perfect—rustic is fine. Press them together firmly so they hold their shape. If they’re too loose, they’ll fall apart in the pan.
Place the fritters in the hot skillet, leaving space between them. Don’t overcrowd the pan! Cook in batches if necessary. I usually fit 4-5 fritters in my 12-inch skillet. Cook for 3-4 minutes on the first side, until the bottom is golden brown and crispy. You’ll see the edges start to pull away from the pan slightly. This is your cue to flip.
Flip the fritters carefully using a spatula. Cook for another 3-4 minutes on the second side, until golden brown and cooked through. The internal temperature should reach 165°F if you’re using a thermometer, but if you don’t have one, just make sure the center is hot and the cheese is melted.
Step 5: Drain and Serve (2 minutes)
Transfer the cooked fritters to a plate lined with paper towels to absorb any excess oil. Repeat with the remaining mixture, adding more oil to the pan as needed. Serve immediately while they’re hot and crispy. They’re amazing on their own, but I love them with a side of ranch dressing, ketchup, or a simple yogurt-dill sauce.
Total Time: About 25-30 minutes (5 minutes prep, 20 minutes cooking)
Troubleshooting Tips:
- Fritters falling apart? Your mixture was too wet. Add more flour or an egg. Or, you didn’t squeeze the broccoli enough.
- Burnt outside, raw inside? Your heat was too high. Lower the heat to medium-low and cook slower.
- Not crispy enough? Don’t flip them too early. Let them develop a crust before flipping. Also, make sure your pan is hot before adding the oil.
Expert Tips & Tricks
Here’s everything I’ve learned from making these cheesy broccoli and chicken fritters dozens of times. These tips will save you from my mistakes.
Squeeze That Broccoli
I can’t stress this enough. Moisture is the enemy. If your broccoli is wet, your fritters will steam instead of fry. Use a towel, squeeze hard, and don’t be gentle. I’ve made this mistake twice, and the result was always a soggy, mushy disaster. Now, I squeeze until my hands hurt. It’s worth it.
Don’t Skip the Flour
The flour isn’t just a filler; it’s a binder. It helps hold the chicken and broccoli together so the fritters don’t fall apart in the pan. If you’re trying to avoid gluten, use a gluten-free flour blend, but don’t skip it entirely. You need that structure.
Use a Food Processor
Chopping broccoli by hand is tedious and inconsistent. A food processor gives you uniform, tiny pieces that cook evenly and distribute throughout the fritter. If you don’t have one, use a sharp knife and take your time. Small pieces are key.
Keep the Heat Medium
I know it’s tempting to crank up the heat to cook faster, but high heat burns the outside before the inside is done. Medium heat allows the fritters to cook through evenly while developing a beautiful golden crust. Patience pays off.
Make Them Small
Smaller fritters cook faster and are easier for kids to eat. I make mine about the size of a hockey puck, but you can go smaller if you want. Mini fritters are perfect for appetizers or lunchbox additions.
Pro Trick: The Oven Finish
If you’re making a large batch, finish the fritters in a 200°F oven while you cook the next batch. This keeps them warm and crispy without overcooking. I use a wire rack over a baking sheet for this. It’s a lifesaver when feeding a hungry family.
Variations & Substitutions
Once you’ve nailed the basic version, here’s how you can mix it up. I’ve tried all of these, and they’re all winners.
Veggie-Packed Version
Add finely grated zucchini, carrots, or bell peppers to the mixture. I sometimes add a handful of spinach or kale. Just make sure to squeeze out any excess moisture from the new veggies. This adds even more nutrition and flavor.
Cheesy Twist
Swap the cheddar for pepper jack for a spicy kick, or use mozzarella for a milder, stretchier melt. I’ve also tried feta, which adds a tangy, salty punch. Experiment with different cheeses to find your favorite.
Herb-Infused
Add fresh herbs like dill, cilantro, or basil to the mixture. I love adding a tablespoon of fresh dill—it pairs beautifully with the chicken and broccoli. It’s a subtle change, but it elevates the flavor profile.
Dip It Up
Serve with different dips to change the vibe. Ranch is classic, but try honey mustard, spicy mayo, tzatziki, or even a simple balsamic glaze. I keep a variety of dips on hand so everyone can customize their experience.
Dietary Modifications:
- Gluten-Free: Use a 1:1 gluten-free flour blend. Everything else is naturally gluten-free.
- Dairy-Free: Skip the cheese or use a dairy-free cheese alternative. The fritters will still hold together, but they won’t be as gooey.
- Egg-Free: This is tricky because eggs are the binder. You can try using a flax egg (1 tablespoon ground flaxseed mixed with 3 tablespoons water) per egg, but the texture may be slightly different. I haven’t tested this extensively, so proceed with caution.
Serving & Storage
How to Serve:
I usually serve these straight from the skillet with a side of dipping sauce. They’re perfect as a main dish with a simple green salad, or as an appetizer for parties. My kids love them with ketchup, but I’m partial to a creamy garlic aioli. Whatever you choose, they’re delicious.
Storage Instructions:
Refrigerator: Store leftover fritters in an airtight container for up to 4 days. They’ll keep well in the fridge, and the flavors actually meld together over time.
Reheating: The best way to reheat them is in the oven or air fryer. Preheat to 350°F and bake for 5-7 minutes, or air fry for 3-4 minutes. This restores the crispiness. You can microwave them, but they’ll lose their crunch and become soft. If you must microwave, do it in short bursts and accept the softer texture.
Freezing: Yes, you can freeze these! Let them cool completely, then place them in a single layer on a baking sheet and freeze for 1-2 hours. Once frozen, transfer them to a freezer bag. They’ll keep for up to 3 months. To reheat, bake from frozen at 375°F for 10-12 minutes. They come out surprisingly crispy!
Meal Prep: These are fantastic for meal prep. Make a big batch on Sunday, store them in the fridge, and reheat them throughout the week. They’re perfect for lunchboxes, quick dinners, or even breakfast (yes, breakfast!).
Nutrition Information
I’m not a nutritionist, but here’s the breakdown if you’re tracking. Keep in mind that these are estimates based on standard ingredients.
Per Serving (based on 6 servings, 4 fritters per serving):
- Calories: 280
- Protein: 22g
- Carbs: 12g
- Fiber: 2g
- Sugar: 2g
- Fat: 16g
- Saturated Fat: 6g
- Cholesterol: 90mg
- Sodium: 450mg
What’s Good:
- High in protein from the chicken and eggs.
- Contains vegetables, which add fiber and vitamins.
- Relatively low in carbs compared to traditional fried foods.
What to Know:
- Higher in fat due to the cheese and cooking oil.
- Contains dairy and gluten.
- Sodium content can vary based on the cheese and chicken used.
My Take:
Look, these are comfort food. They’re not a diet recipe. But they’re way better than takeout, and you know exactly what’s in them. When I want to make them lighter, I use less oil and low-fat cheese. But usually? I just eat a reasonable portion and enjoy them. Balance is key.
Final Thoughts
So that’s my go-to back-to-school cheesy broccoli and chicken fritters! I’ve probably talked your ear off at this point, but when you make a recipe this often, you have a lot to say about it.
This has saved weeknight dinners more times than I can count. It’s my answer to “what’s for dinner” when I’m tired, don’t want takeout, and still want something that tastes really good. My kids are happy, my husband’s happy, and I’m happy because I’m not stressed about cooking.
Make it yours! Try different add-ins, swap in your favorite vegetables, adjust the spices to your liking. The best recipes are the ones you adapt to your family’s tastes. And if you’re feeling adventurous, try serving them with a unique dip. You might discover a new favorite combination.
If you make this, drop a comment and let me know what you think! I love hearing how recipes turn out in your kitchen. And if something doesn’t work, tell me that too—I’m here to help troubleshoot. Happy cooking! And I hope your kitchen smells half as good as mine does right now.
Frequently Asked Questions
Can I use raw chicken instead of cooked?
You can, but it’s not recommended. Raw chicken releases a lot of water as it cooks, which can make the fritters soggy and difficult to flip. Plus, you’d need to cook the chicken first anyway to ensure it’s safe. Using rotisserie or pre-cooked chicken is much easier and safer. If you must use raw chicken, grate it finely and ensure the fritters are cooked through completely, but I stick with cooked chicken for best results.
Why did my fritters fall apart in the pan?
This usually happens for two reasons: either the mixture was too wet, or you didn’t let them cook long enough on the first side. Make sure you’ve squeezed all the moisture out of the broccoli. Also, press the patties firmly together before cooking. And don’t flip them too early! Let them develop a golden crust on the bottom, and they’ll release from the pan easily. If they’re still falling apart, add a little more flour or an egg to the mixture.
Can I bake these instead of frying?
Yes! Baking is a healthier option. Preheat your oven to 400°F. Place the formed fritters on a parchment-lined baking sheet. Brush the tops lightly with oil. Bake for 15-20 minutes, flipping halfway through, until golden brown and cooked through. They won’t be as crispy as pan-fried, but they’re still delicious and easier to clean up.
How do I store leftovers?
Store leftovers in an airtight container in the refrigerator for up to 4 days. Reheat in the oven, air fryer, or skillet to restore crispiness. Avoid the microwave if you want them to stay crispy. They also freeze well for up to 3 months.
Can I make these ahead of time?
Absolutely! You can form the fritters and store them in the fridge for up to 24 hours before cooking. Just cover them tightly with plastic wrap. This is great for busy mornings or when you want to prep dinner in advance. You can also freeze the uncooked fritters on a baking sheet, then transfer them to a bag. Cook from frozen, adding a few minutes to the cooking time.
What dips go well with these?
Ranch dressing is the classic choice. Honey mustard, spicy mayo, tzatziki, and ketchup also work great. For a healthier option, try Greek yogurt mixed with lemon juice and dill. Get creative! The savory, cheesy flavor of the fritters pairs well with a variety of dips.
Pin This Recipe!


Back-to-School Cheesy Broccoli and Chicken Fritters
- Total Time: 25 minutes
- Yield: 4-6 servings 1x
Description
A quick, crispy, and cheesy fritter recipe perfect for busy weeknights. These savory patties hide finely chopped broccoli inside a binding of chicken, cheese, and spices, making them a favorite for picky eaters and a great way to use up leftovers.
Ingredients
- 3 cups cooked chicken, shredded or diced (about 450g)
- 2 cups broccoli, finely chopped (about 150g)
- 2 large eggs
- 1 cup shredded cheddar cheese (100g)
- ½ cup all-purpose flour (60g)
- 3 cloves garlic, minced
- ½ medium yellow onion, finely diced
- 1 teaspoon dried parsley
- ½ teaspoon black pepper
- ½ teaspoon salt
- 2 tablespoons olive oil or avocado oil (for cooking)
Instructions
- Prep the broccoli: If using frozen, thaw and squeeze out all excess moisture using a clean kitchen towel. Pulse fresh or thawed broccoli in a food processor until finely chopped, or chop finely by hand.
- Mix the base: In a large bowl, combine the shredded chicken, chopped broccoli, shredded cheddar, eggs, flour, minced garlic, diced onion, dried parsley, black pepper, and salt. Mix until well combined. Taste a small amount to adjust seasoning if needed.
- Heat the pan: Place a large skillet (preferably cast iron or non-stick) over medium heat. Add 2 tablespoons of oil and let it heat until shimmering.
- Form the fritters: Using your hands or a scoop, form the mixture into patties about 3 inches wide and ½ inch thick. Press firmly to ensure they hold together.
- Cook: Place fritters in the hot skillet, leaving space between them. Cook for 3-4 minutes on the first side until golden brown and crispy. Flip carefully and cook for another 3-4 minutes on the second side until cooked through and golden.
- Drain and serve: Transfer cooked fritters to a plate lined with paper towels to absorb excess oil. Serve immediately with desired dips like ranch, ketchup, or honey mustard.
Notes
Ensure broccoli is thoroughly squeezed dry to prevent soggy fritters. Do not overcrowd the pan; cook in batches if necessary. For a gluten-free version, use a 1:1 gluten-free flour blend. For dairy-free, omit cheese or use a dairy-free alternative. These can be baked at 400°F for 15-20 minutes for a healthier option.
- Prep Time: 10 minutes
- Cook Time: 15 minutes
- Category: Main Course
- Cuisine: American
Nutrition
- Serving Size: 4 fritters per servi
- Calories: 280
- Sugar: 2
- Sodium: 450
- Fat: 16
- Saturated Fat: 6
- Carbohydrates: 12
- Fiber: 2
- Protein: 22
Keywords: chicken fritters, broccoli recipes, quick dinner, kid-friendly meals, rotisserie chicken recipes, weeknight dinner, crispy fritters, healthy chicken recipes


